Tuesday, March 31, 2015

It Worked for Me - An Webserver under FreeRTOS on an ESP8266

If you are looking for a webserver to run on an ESP8266 using the FreeRTOS SDK the httpserver_raw server in the contrib-1.4.1.zip file is worth a look.

It compiles and runs using the Unofficial Development Kit for Espressif ESP8266 under Cygwin64 on Windows 7.

The zip file is located at: http://download.savannah.gnu.org/releases/lwip/.

image

Sunday, March 22, 2015

ESP8266 Program Examples

Back in December I had ordered and received an Olimex MOD-WIFI-ESP8266-DEV.  I posted some overview and setup information.

Now I have developed some examples that demonstrate native programming of the ESP8266 in c. The examples were built on Windows using Cygwin64 and the Unofficial Development Kit for Expressif ESP8266.

The examples contain a good bit of documentation in the hopes that they will help other people with their projects.

The basic flow of an ESP8266 program using the Espressif SDK is an event / callback model.  The user defines a set of callbacks in user_init.c.  The callbacks are triggered when events such as a timer also setup in user_init.c expires. 

Another example is a callback that is triggered when a connection is made to the ESP8266 by a client.  This callback can take action based on the connection and may in turn setup additional callbacks.

The example code is on GitHub at digitalhack / dhESP8266.

Hello Digitalhack Example

The first example is a take on the standard helloworld.  I demonstrates use of the user_init.c function for setting up the program, a timer and timer callback function ands printing output to UART0 and UART1.

UART0 is a full UART with both TX and RX that is used to load your code to the ESP8266.  UART1 only has a TX signal and is used for debug messages.

Screen capture from Cygwin of make and flashing the code to the esp8266.

image

UART0 Output from Example

image

UART1 Output from Example

image

Basic Connect Example

This example shows how to setup the ESP8266 to connect to a wireless access point.  The ssid and password for the wireless network are in user_config.h in the examples include file.

UART1 Output from Example

image

Once you see the ip address the EXP8266 has acquired on the debug line (UART1) you should be able to ping the ip address and get a response.

image

Simple Server Example

This example shows how to setup a very simple server.  When a user telnets to the ESP8266 they are prompted for a name.  Once this is entered it is echoed name back to the user before disconnecting.  It demonstrates the callbacks necessary to for TCP communication.

UART1 Output from Example

image

Cygwin screen capture of a session.

image

The example code is on GitHub at digitalhack / dhESP8266.

Saturday, March 7, 2015

pcDuino3 Nano / OpenMediaVault - Setup Windows File Sharing

This is another in the series documenting my setup of a new home server with the Linksprite pcDuino3 Nano.  A listing for the entire series can be found here.  More information on the pcDuino3 Nano can be found at Linksprite’s website and the pcDuino website.

Once you have successfully installed OpenMediaVault you will need a basic configuration to be able to use it. Below is a set of steps that will provide you with basic file sharing for Windows.  You will setup a share named testshare which can be accessed by user testuser using password test123. 

These steps are just to get you started.  The resulting configuration isn’t secure and shouldn’t be used except as a starting point.

To get started enter the IP address of your pcDuino3 Nano OpenMediaVault server.  You will get prompted to login.  Enter username: admin and password: openmediavault and then select the Login button.

image

The page that will come up provides basic information about your OpenMediaServer.  The first thing to do is set the Hostname and Domain name.  Select Network (1) from the menu on the left.

image

Enter the Hostname (1): testshares and Domain name (2): testnet.local.  The select Save (3).

image

Anytime you change a parameter in OpenMediaVault it will ask you to apply the changes.  To do this  you will select Apply (1) and then Yes (2).

image

A message box informing you that the changes are being applied will be shown.  When that message box goes away the changes will have been applied. 

Note that for the steps subsequent to this I will be omitting these two web pages from the instructions as they are always the same.

image

Once the changes have been applied we will next add a user.  To add users select User (1) from the menu on the left.

image

On the next page select +Add (1) and then Add (2).

image

Enter a Username (1): testuser, Password (2): test123, and Confirm password (3): test123.  Make sure that the users Group is selected as that will give you read and write access to the share we create.  Finally select Save (4).  As stated above you will need to Apply the change, select Yes, and wait for the change to be applied.

image 

After you have applied the changes your user will be show.  The next step is to create a file system on our SATA drive.  To do this select File Systems (1) from the menu on the left.

image

On the web page the appears you will select +Create (1)

image

In the box that is displayed select your device (1).  Your SATA device will likely be the only device to select.  Enter a Label (2): Data and select OK (3).

image

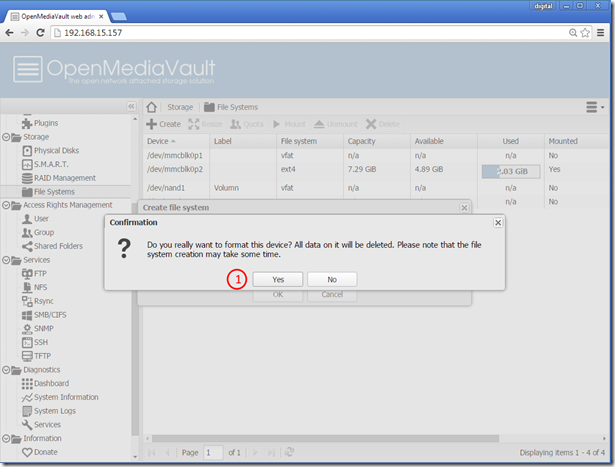
After selecting OK you will be warned that all your data on the device will be lost.  Make sure you don’t have anything on the device you care about and select Yes (2).
image

When the device completes formatting you will be returned to the device page and you will need to mount your device.  Select your device (1) and then select Mount (2).  Next select Apply the changes and select Yes.

image

Your device should now show that it is mounted (1).  Next we will create a shared folder.  To do this select Shared Folders (2).

image

On the Shared Folders page select +Add (1).

image

On the Add shared folder box enter the Name (1): testshare, Volume (2): Data and let everything else default.  Select 3 to create the share.

image

The Shared Folders page will now show you shared folder.  The next step is to enable and configure SMB/CIFS.  To do this select SMB/CIFS from the menu on the left.

image

On the SMB/CIFS Setting Tab Enable (1), enter your Workgroup (2): WORKGROUP and then select Save (3).  You will need to Apply the settings and select Yes to apply.

image

The next step is to setup the share.  On the Shares Tab select +Add (1).

image

Check the Enable box (1) and then select you Shared folder (2): testshares and let the rest default.  Finally select Save, the Apply and Yes.

image

The Shares Tab should now show you Shared folder (1).

image

From your windows host browse your network and you should see the TESTSHARES server (1).  Select the server and logon using Username:testuser and Password: test123.

image

After you authenticate you should be able to see the share you created from your Windows PC.

image

You can find more information on OpenMediaVault at http://www.openmediavault.org/.  The Wiki is especially helpful.

Monday, March 2, 2015

pcDuino3 Nano - Home Server NAS Performance

This is another in the series documenting my setup of a new home server with the Linksprite pcDuino3 Nano.  A listing for the entire series can be found here.  More information on the pcDuino3 Nano can be found at Linksprite’s website and the pcDuino website.

Last week I got a comment on my pcDuino3 Nano – NAS or ??? posting where the commenter had found the pcDuino3 Nano unusable as a NAS due to slow performance and lockups.  As I hadn’t done any testing I decided to run some tests.

For testing I used OpenMediaVault running on Debian Wheezy.  The test machine and the pcDuino3 Nano were connected via Gig LAN ports.  On the pcDuino2 Nano I was using a 2.5 inch SATA drive rated at 72000 RPM and 3.0 Gb/s.  For running the tests I used the Intel NAS Performance Toolkit

I ran 8 passes of the full test suite.  The system never locked up and response time was in line with what I would expect from the board.  It will not win any competitions for speed but it is quite usable.

For comparison I ran 4 passes of the full test suite on my Raspberry PI OpenMediaServer.  The Pi also ran all the tests successfully but with much slower response times.

Below is a summary of the results of the tests.

  pcDiuno3 Nano Raspberry PI
HD Video Playback 18.1 4.1
2x HD Video Playback 16.8 4.3
4x HD Video Playback 16.1 4.5
HD Video Record 24.4 9.4
HD Playback and Record 23.0 5.9
Content Creation 3.9 1.2
Office Productivity 25.3 12.9
File copy to NAS 13.1 6.0
File copy from NAS 30.3 3.9
Dir copy to NAS 3.4 2.8
Dir copy from NAS 6.6 2.9
Photo Album 4.1 2.2

I am working on some posts about configuring OpenMediaVault on the pcDuino3 Nano. I should have them posted in a week or two.