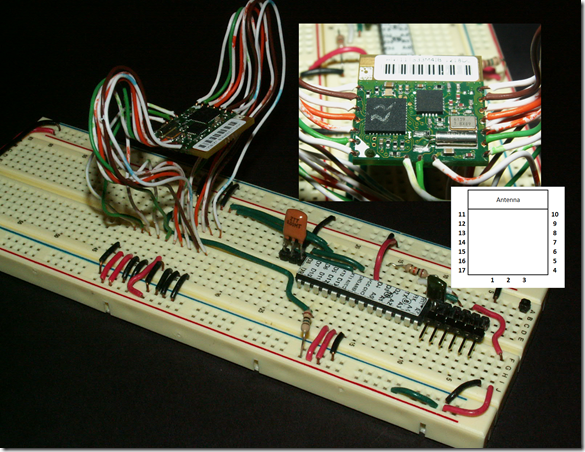
As outlined in a previous post I am working on a project to interface an ANT+ Garmin Hear Rate Monitor Strap to an Android tablet. The first phase is to get heart rate statistics sent via ANT from the heart rate monitor to an Arduino.
I am working on solutions with two ANT modules: Sparkfun’s USB ANT Stick and Dynastream Innovations ANT11TS33M4IB Module.
Sparkfun USB ANT Stick Hardware Setup
Both modules run at 3.3V so I wired up an 8Mhz breadboard Arduino running at 3.3V. Connecting the Sparkfun USB ANT Stick was easy. All that was required was soldering four pins into the holes located on the board. If you look at the insert of the board in the picture below you will see the four pins.
Once the pins were connected the board was plugged into the breadboard with power connected to the power rail running at 3.3v, ground to the ground rail, receive to D7 and transmit to D8 on the Arduino.
Dynastream Innovations ANT11TS33M4IB Module Hardware Setup
Connecting the Dynastream module was a bit more of a challenge than the Sparkfun module. The Dynastream module is a square board that measures roughtly 0.75” of an inch. On two sides of the board there are 7 holes / pads and on a third there are 3. Given the spacing of the holes and their locations the module isn’t breadboard friendly.
I found that the individual wires in a Cat5 LAN cable were the right size to fit into the holes. I cut a section of Cat5 cable, extracted the individual wires and soldered them to the board and then plugged them into the breadboard.
Additional pictures from the sides showing the connections:The following pin out was used.
| Module Pin | Pin Name | Connected To |
| 1 | GND | GND |
| 2 | /RESET | 3.3v |
| 3 | Vcc | 3.3v |
| 4 | GND | GND |
| 5 | GND | GND |
| 6 | /SUSPEND | 3.3v |
| 7 | SLEEP | GND |
| 8 | GND | GND |
| 9 | GND | GND |
| 10 | BR2 | GND |
| 11 | TXD0 | D7 |
| 12 | RXD0 | D8 |
| 13 | BR1 | GND |
| 14 | BR3 | GND |
| 15 | GND | GND |
| 16 | GND | GND |
| 17 | RTS | D12 w/1Mohm to 3.3v |
The 1M ohm pull up resister on pin 17 is key. If you don't have it the board goes into sensRcore mode and will not respond to async communications.
Next Steps
With the hardware all setup the next step will be to program the Arduino and test communications from the heart rate monitor strap through the ANT module to the Arduino. This will be the subject of the next post.


No comments:
Post a Comment