I decided that I wanted to experiment at programming the boot loader into chips myself. This started me down an interesting path.
After spending some time with Google and based on what I had around I decided that I would build a parallel programmer. For reference I used the directions on the Arduino site for a parallel programmer.
I modified the design to include a 28 pin dip socket so I would have something to put the chip in. After putting it all together and checking the connections with my trusty multi-media I couldn’t get it to work. I played around with it and with avrdude finally giving up after running out of ideas.
I went back to the drawing board and this time settled on a serial programmer that I could build with what I had on hand augmented with some parts from Radio Shack. Using this schematic I found in the adafruit forums.
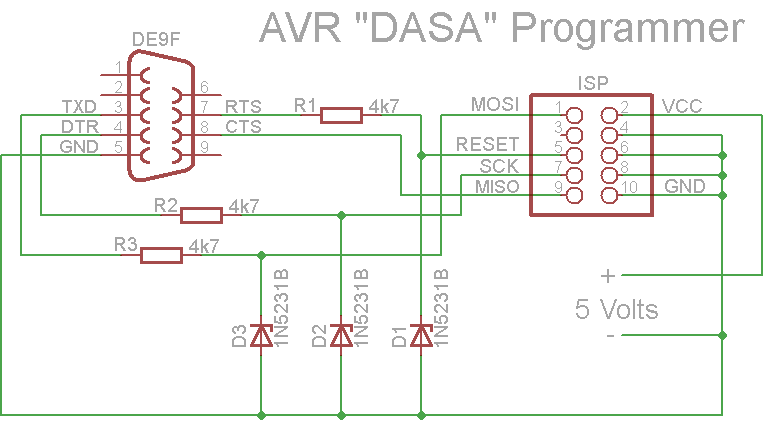
I modified the design to us a 6 pin isp connector rather than the 10 pin in the schematic. I also built a simple chip cradle with a 6 pin isp connector and a power connector.
Once I had completed building both the programmer and the chip cradle and checking them out with the multi-meter I plugged it in and…
Nothing. Avrdude running on the PC didn’t see the atmega chip.
After a good nights rest and some more time with Google I determined that my problem was that, as I was using a pre-loaded Arduino chip that was set to us an external crystal/oscillator that I needed to add one to my chip cradle.
Given the mess of wires connecting all the pins together on the underside of the chip cradle this wasn’t easy. However, soon I had a chip cradle with a socket for an external oscillator. I plugged in the oscillator and…
Nothing. Once again avrdude running on the PC didn’t see the atmega chip. Looking at the oscillator and the socket it appeared that the legs of the oscillator might be thin enough not to be making contact. A slight wiggle of the oscillator and success!
I fixed this problem by soldering the oscillator to 3 pins which fit the socket better and it has been working ever since.
Below are several pictures of the finished product.
As usual I need to thank a number of good people who have been down this path before me for marking the way with their posted results. The adafruit, Sparkfun and Arduino forums were invaluable.
Serial Programmer with DB9 serial connector.

Serial Programmer with Sparkfun 3.3v/5v regulated power supply attached.


Chip cradle with oscillator

No comments:
Post a Comment