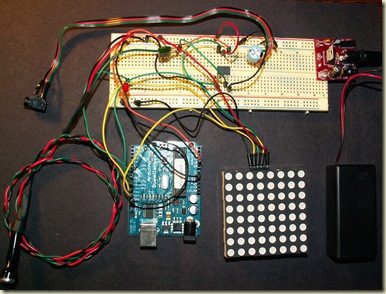
For this project I connected a microphone via an amplifier IC (LM386N) to the Arduino to drive the Sparkfun 8x8 multicolor LED Matrix. The LED was programmed to generate random ranges of colors based on the how loud the sound is.
This week I got in an order that I had been waiting for from Futurlec and therefore I am going to put this project on hold as I have some new components I want to test out.
I am posting this mostly so I will have a record of what I had done that I can come back to.
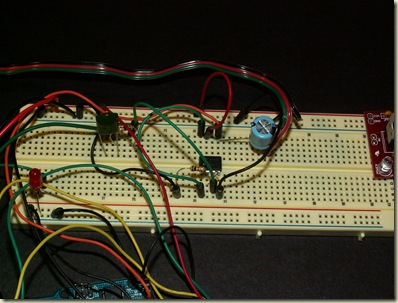
Below is the amplifier on the breadboard.
The code was hacked together quickly from a couple of examples.
//Define the "Normal" Colors
#define BLACK  0
#define RED  0xE0
#define GREEN  0x1C
#define BLUE  0x03
#define ORANGE  REDGREEN
#define MAGENTA  REDBLUE
#define TEAL  BLUEGREEN
#define WHITE (REDGREENBLUE)-0xA0

//Define the SPI Pin Numbers
#define DATAOUT 11//MOSI
#define DATAIN  12//MISO
#define SPICLOCK  13//sck
#define SLAVESELECT 10//ss

//Define the variables we'll need later in the program
char cleardisplay [64];
char n1 = 0;
char reddisplay[64];
char n2 = 0;
char greendisplay[64];
char n3 = 0;
char bluedisplay[64];
char n4 = 0;
char rdisplay[64];
char n5 = 0;

char color;
char clearcnt;

int val;
int amp;
int ledPin = 8;                // LED connected to digital pin 13

void setup() {
  //SPI Bus setup
  //Enable SPI HW, Master Mode, divide clock by 16
  SPCR = (1<<SPE)(1<<MSTR)(1<<SPR1);

  //SPI Bus setup

  //Set the pin modes for the RGB matrix
  pinMode(DATAOUT, OUTPUT);
  pinMode(DATAIN, INPUT);
  pinMode(SPICLOCK,OUTPUT);
  pinMode(SLAVESELECT,OUTPUT)

  //Make sure the RGB matrix is deactivated
  digitalWrite(SLAVESELECT,HIGH);

  for(int LED=0; LED<64; LED++){
    cleardisplay[LED] = 0;
    reddisplay[LED] = RED;
    greendisplay[LED] = GREEN;
    bluedisplay[LED] = BLUE;
  }
  color = 0;
  clearcnt = 0;
  pinMode(ledPin, OUTPUT);      // sets the digital pin as output

  Serial.begin(9600);
  setdisplay(cleardisplay);
}

void loop() {
  val = analogRead(1);
  amp = (val >= 415) ? val - 415 : 415 - val;
  if (amp > 30) {
    digitalWrite(ledPin, HIGH);
    if (amp > 50) {
      if (color != RED) {
        rnddisplay(RED);
        color = RED;
      }
    } else if (amp > 40) {
      if (color != GREEN) {
        rnddisplay(GREEN);
        color = GREEN;
      }
    } else if (amp > 30) {
      if (color != BLUE) {
        rnddisplay(BLUE);
        color = BLUE;
      }
    }
    delay(250);
  } else {
    if (clearcnt > 1) {
      digitalWrite(ledPin, LOW);
      setdisplay(cleardisplay);
      color = 0;
      clearcnt = 0;
    } else {
      clearcnt++;
    }
  }
}

void rnddisplay(char color) {
  for(int LED=0; LED<64; LED++) {
    rdisplay[LED] = random(9) + color;
  }
  setdisplay(rdisplay);
}

void setdisplay(char displaybuf[64]) {
  digitalWrite(SLAVESELECT, LOW);
  for(int LED=0; LED<64; LED++){
    spi_transfer(displaybuf[LED]);
  }
  digitalWrite(SLAVESELECT, HIGH);
}

//Use this command to send a single color value to the RGB matrix.
//NOTE: You must send 64 color values to the RGB matrix before it displays an image!

char spi_transfer(volatile char data) {
  SPDR = data;                    // Start the transmission
  while (!(SPSR & (1<<SPIF))) {   // Wait for the end of the transmission
  };
  return SPDR;                    // return the received byte
}


No comments:
Post a Comment